Showing posts with label arts & crafts. Show all posts

Sunday, August 26, 2018

Stones Turned to Animal Art

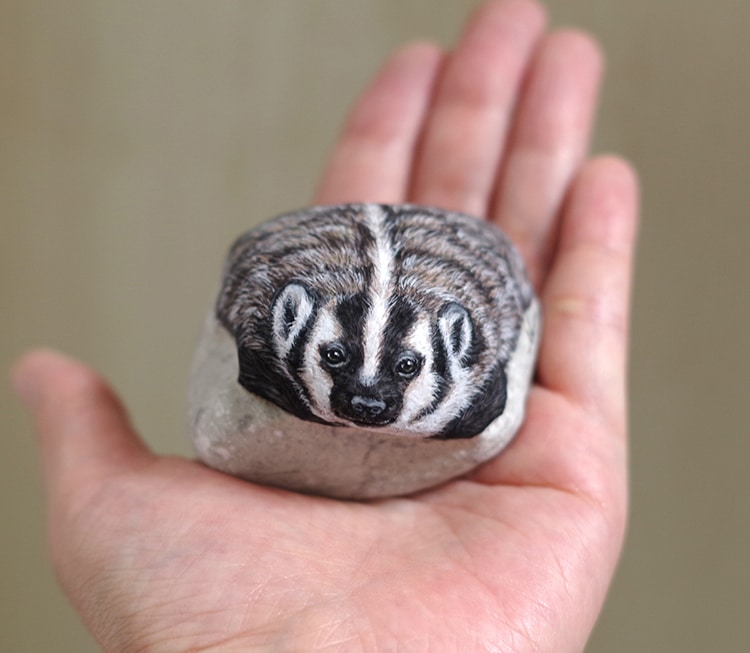
Japanese artist Akie Nakata (known simply as Akie) turns found stones and rocks into adorable animal paintings you can hold in the palm of your hand. Inspired by the natural shapes of each stone she comes across, Akie chooses the ones she believes already have their own destined characters. Ever since she was a child, the self-taught artist has loved collecting stones. She began her stone paintings in 2011 when, while taking a walk along a river bank, she encountered a particular pebble that looked like a rabbit. The artist tells My Modern Met in an email, “Stones have their own intentions, and I consider my encounters with them as cues […] to go ahead and paint what I see on them.”

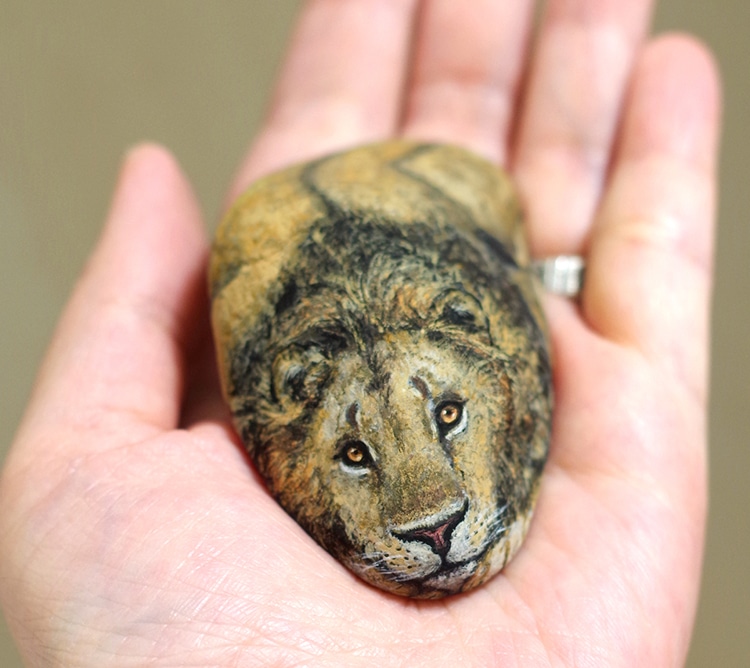
After sourcing the animal-shaped stones, Akie considers each character carefully. She asks herself, “Am I positioning the backbone in the right place? Does it feel right? Am I forcing something that disagrees with the natural shape of the stone?” She then carefully paints the stone’s surfaces with acrylic paint. From cats and dogs to owls, mice, and even an entire opossum family, each of Akie’s stone animals look remarkably lifelike. Painting the eyes last, Akie considers her work complete when she sees “the eyes are now alive and looking back [at her.]” She tells us, “To me, completing a piece of work is not about how much detail I draw, but whether I feel the life in the stone.”

While some might contest that a stone is not a living organism, when Akie holds one in her hand, she feels everything it has “silently witnessed over the millennia.” Believing each rock has a story to tell, the artist decides to breathe life into each one with her paintings. She reveals, “Sometimes I paint while I talk to the stone as I hold it in my hand.” Akie hopes that her stone animals will be treasured by those who hold them, as they treasure their own lives “because we all stand on the same earth, and we come from the same earth.”

You can find more of Akie’s incredible artwork on Instagram, and if you're lucky enough, you may get the chance to own one of her unique pieces when she announces their availability on Facebook. Japanese artist Akie Nakata turns found stones and rocks into adorable animal paintings you can hold in the palm of your hand.
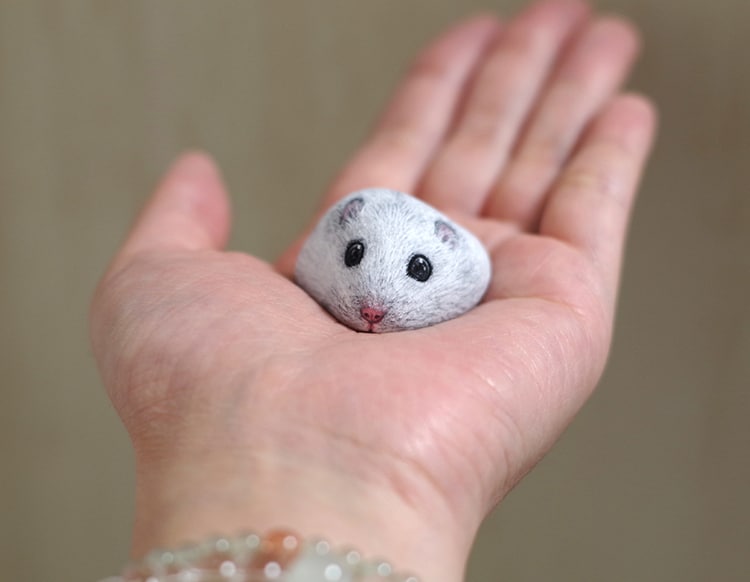

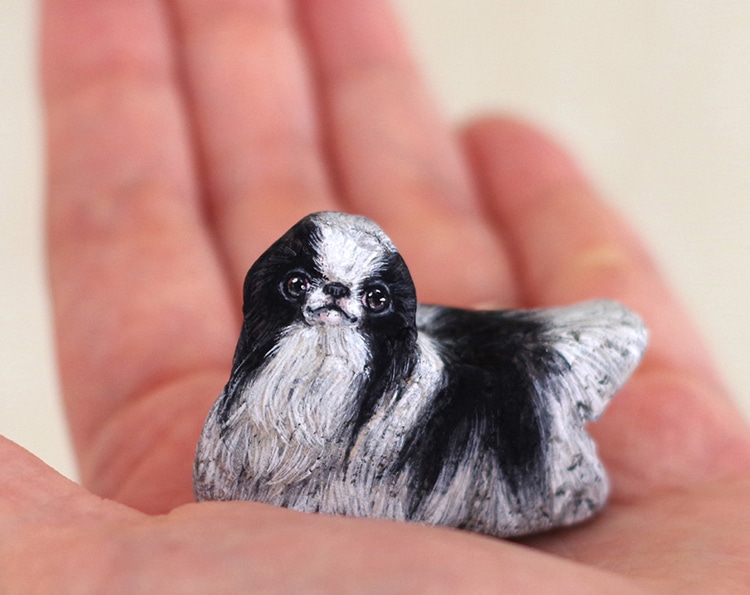
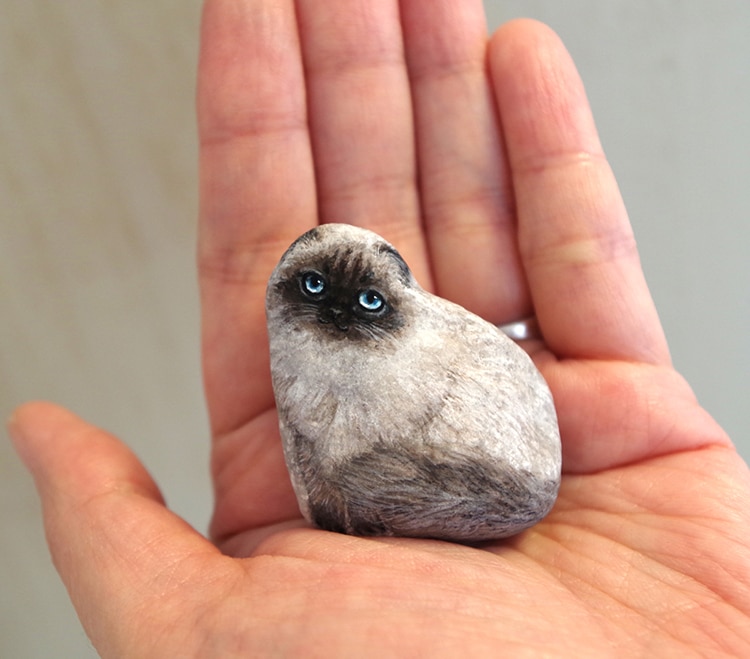
Inspired by the natural shapes of each stone, Akie uses acrylic paint to bring their creature characters to life.
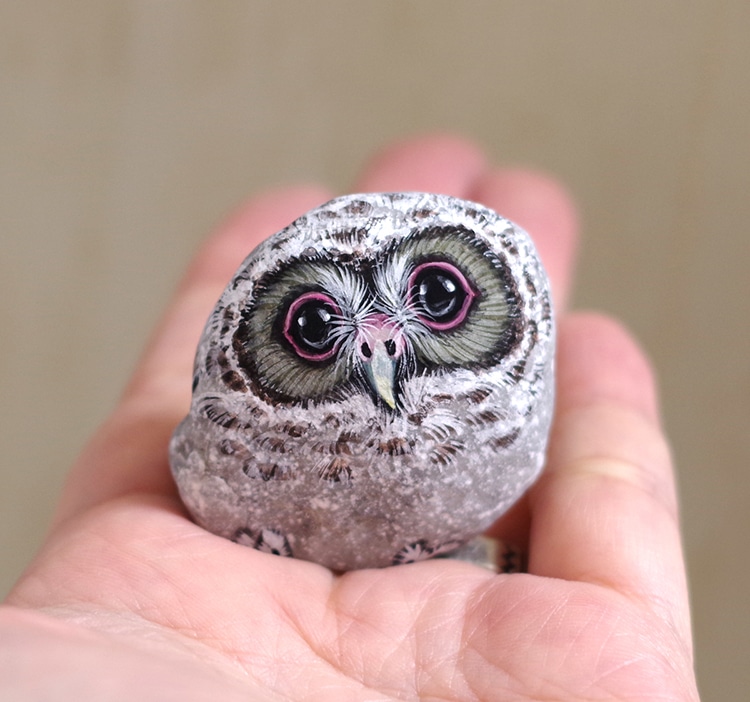
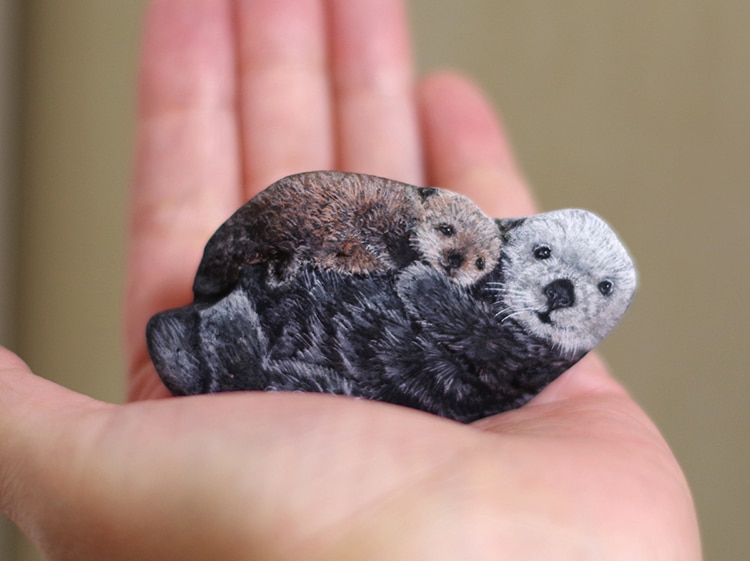
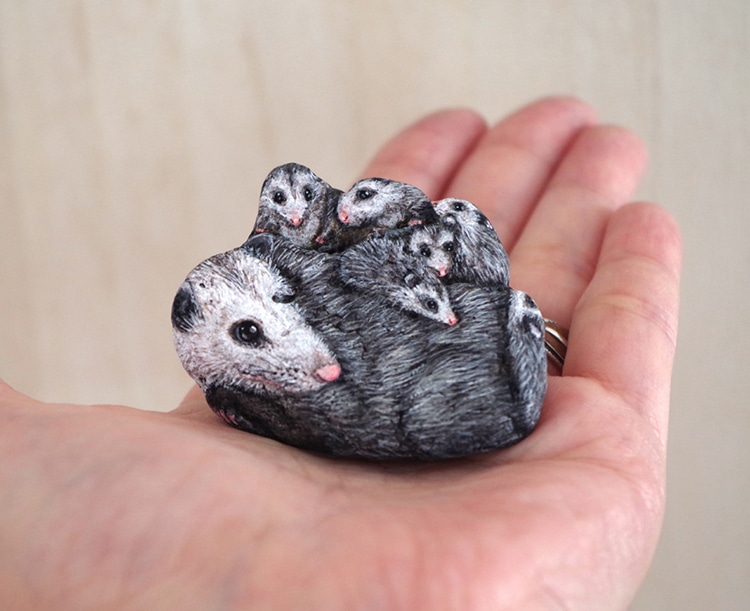
Each stone animal looks remarkably lifelike.
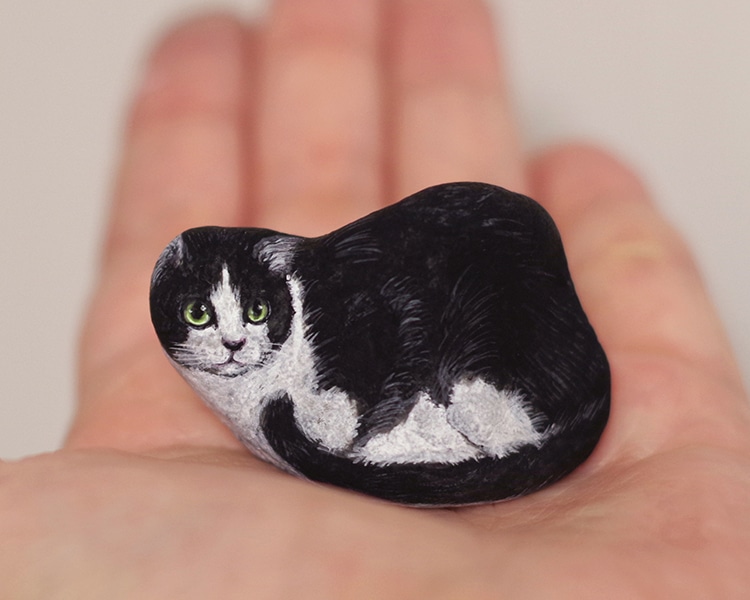
Animal Stone Paintings by Akie Nakata

Sunday, October 2, 2016

Painting Baby Shower Giraffes

Two baby showers for members in our church—both for boys—so two different kinds of decorations needed. For one I made four different kinds of safari animals, and a friend created diaper cakes for the table centerpieces with the animals around. Wow! I was planning to just put a few safari animals in the middle of the three tables with paper decorations under, but my friend outdid herself and decorated the diaper cakes. The tables looked simple but fabulous!

One month later, another baby shower, also for a boy. Browsing through pictures of baby shower decorations, I saw a balloon with a simple giraffe picture—a mother "pregnant" with her baby. Just the simplicity of it I loved, and since I'm a scroll sawer, I thought the mother-baby design would look great in wood, so whip-sketched it and found a piece of 3/4" pine to cut it out in. With a foot in height giraffe, I needed the 3/4" wood for the giraffe to stand alone properly. 

After cutting it out, sanded it down to make a smooth finish in case the baby eventually plays with it, and then painted it with non-toxic water colors. Was a bit worried about the colors running so gave it a light quick spray of gloss, which should lock the colors in case of water spills. Not much but still I don't think a baby should put the giraffe in his mouth. A caution on painting this, however. I ever so slightly painted the inside of the giraffes where they meet and then allowed the giraffes to dry in the sun. After I painted that area with one light coat of very watery color just to stain the area, the giraffes didn't slide as smoothly apart and back together. Just a caution if you intend to make one of these cute creatures too.


Collage of the safari animals and the polka-dotted giraffe.

Monday, September 12, 2016

Baby Shower Diaper Cake and Safari Animals

Agenda: Find two "boy" ideas to make table centerpieces for up-coming baby showers. Wasn't sure what the themes for the showers were but when browsing the Internet for baby shower and decoration ideas, saw some nifty paper plates with safari animals on them. Wah-lah! They were so ultra cute so thought I'd cut some out in wood for laying around the central tables. Wasn't sure of the theme but everyone loves baby animals, so this seemed to be a universally bright idea.

Cut the animals out in pine—pine takes water colors easily and I have a lot of it on hand. And used a fresh blade so that I wouldn't have to sand much in the leg areas. Because they cut so smoothly, I took a surface sander and mostly gave the tops and bottoms a good sanding—don't want any rough parts if the baby plays with them.

The painting took a fair bit of time. I got a lot of compliments on painting the face of the lion but, wow, that was very easy. It was those lousy stripes on the zebras that took so much time. The baby zebra got all messed up the first time around so sanded it down again, painted a white layer over the still-visible marks and put the stripes back on. Better.

Painting the safari animals:

The animals range from about 2 1/2" to just under 5", from the baby zebra to the giraffes.


The baby zebra was by far the hardest to paint. This is the second time around.
The first time the lines were thick and all over the place. The black bled on one of the zebras quite badly
so later touched it up with white.
The smallest giraffe in the pict was an "accident". I was trying to use up the whole board and by moving my pattern around and revising a bit as I went along, I got 3 giraffes instead of the expected two. I still had a tiny bit of wood that looked like it held a giraffe inside, so maneuvered around and was able to get the "baby" giraffe too.
I really like how the giraffes turned out! Most at the shower seemed to like them best too,
although the lions' faces got a lot of comment.
Kudos to my friend who made these ultra-cute diaper cakes. I was thinking to decorate the tables with only the animals in the center and some colored papers underneath, and she was thinking to make her diaper cakes and put a paper monkey on the top of each. I gave her the animals a few days in advance and she came up with this very artful arrangement! Not visible but out of the top of each diaper cake was a high-floating green balloon with streamers!


Monday, April 11, 2016

Decorative Hanji Paper Olive Oil Bottle

Transforming hanji -- handmade Korean mulberry paper -- into something both useful and beautiful is truly a Korean traditional art. For centuries Koreans have fashioned all sorts of beautiful and exotic-looking boxes and even furniture by simply using the hanji to cover layers of dense cardboard and then applying several coats of glue. The end result is a beautiful box or piece of furniture that is quite hard and durable, except being made of paper, it can't withstand much moisture.  

I have many colors of hanji. Some are definitely more textured than others, and not all are hand-dipped. The bright colors to the right (below) are machine manufactured "hanji" -- much cheaper, not so easy to work with and hard to obscure layers, but for some artwork like papering glass bottles, this bright cheaper stuff worked great! I just cut out little squares and rectangles of varying sizes and glued them on using the hanji-style painting method, which is much like decoupage! 


For making the the butterflies I just folded a somewhat stiff piece of black paper in half and cut out a butterfly. Very easy and quite classy to look at. One side of the bottle has two larger butterflies while the opposite side has three. Below is the finished decorative product. To its left is a hanji craft tissue box a friend made and gave me. It's the box that really inspired me to take a hanji craft class and learn the art form for myself.


Tuesday, March 1, 2016

Making Wooden Cats

Mom and I really spent some time just kicking around and doing artsy stuff this winter. The weather outside is cold and so in the warm house with music turned low we spent some afternoons. Many years ago my aunt gave mom a scroll-saw hand-painted cat (in blue -- mom's favorite color) and I started thinking that cats, instead of more Baltic plywood horses like we made last year and again this year, would be a fun novelty to paint ... and then give away. I mean, everybody loves cats! So figured after we painted them, we could then give them away to little old ladies at a nursing home, or just gifts to family and friends.

Cut ... sand ... glue!
Even my younger brother got involved ... and painted three!

OK, so my bro has a "special eye" for cat-painting - LOL!

We painted half. My mom will finish them later with her girlfriends!
I LOVE LOVE LOVE cats, and claimed this brown one!
No name as yet ... but the perfect one will hit me later!

Cats and paints - what a wonderful way to spend an afternoon!

Monday, February 29, 2016

Korean Traditional Hanji Crafts

I recently took a hanji class (in Korea). Hanji is the traditional Korean mulberry paper, the better pieces handmade, that has texture, is fibrous, and is commonly used in many kinds of art -- calligraphy, paintings, crafts and more. The hanji class was one month long, met four times a week, and positively enlightened me on how people can be very clever with paper.

I had so much fun with being creative that I decided my mom would love doing some craftsy things too, so I bought several smallish square boxes -- guess I'll call them candy boxes -- and various kinds of paper. I measured and clipped hanji to cover piece by piece the sides and insides of the boxes, and then after I got to the States, I invited mom's friends over for a craft-day party. 

Of course I had to model how to use the paper and so made a tissue box out of a dark red for my mom's living room, a matching octagonal candy dish with hanja-style hanji (hanja is words written in Chinese script) and also a red jewelry box. They really accent her blue living room and no one has anything like the pieces around! Mom's friends just oohed and aahed, so they got excited about "box making" and were ready to create their small hanji masterpieces. 

Absolutely love the turtle clasp!
So then mom and her two friends made their pieces. I just supervised like my hanji teacher had done for me, and helped them apply the correct layers of glue to harden the box and other tricks like tearing off excess hanji in corners to prevent the paper from drying bulked up. They couldn't finish their boxes in just one hour because when applying the glossy coating, the boxes must be dry. So a few hours after they left I glossed the boxes up with two coatings of gloss. I must say, the boxes turned out really well. One friend was particularly gentle when applying coats of glue -- she brush stroked so gently and carefully because she didn't want to leave any brush impressions in the glue, so I was careful to not leave any impressions when I applied the coating.  


Then I got creative. Instead of just using Korean motifs with the Korean paper, I chose to mix things up a bit -- Korean paper with Western nature motifs and bleached to a rustic antique look. Gave it away to another friend at church but mom's friends were there and while they had previously been all excited about making red wrinkled hanji tissue boxes like I had made mom, they then became more interested in making a rustic country tissue box.

I used woodsies to make the motifs. Kind of cool!
And then I got super creative and wanted to design my own hanji-like table lamp. Instead of using glossed cardboard for framing, I used some Baltic plywood, which is somewhat light and thin, to make the frame. Bought two 15watt craft lights that had switches for turning the lamp on and off, and used a very thick old hangar to secure the two lamp bulbs in fixed hanging position. Took me a few hours to cut my pattern (turned out really rustic), and splice my two lights into one strand. Then it was a matter of just using various kinds of glue to put the hanji on correctly. Not as elegant as I planned but I rather like the rustic look. Had no use for it so gave it away at a church party as the grand prize. The winner seemed quite happy!

With my scroll saw I cut out the Baltic plywood lamp frame.

My Baltic plywood framed hanji lamp. The bulbs were made with hanji paper-machete-ed over two balloons. After the bulbs dried I painted them. Stain would have been better but didn't have any on hand. 
The large pin-holes in the bulbs were made with a darning needle poked through the skin of the bulb.

Sunday, February 14, 2016

Baltic Birch Plywood Tea Box

The lid of mom's plastic tea box broke off ages ago. Since, it's been fixed and refixed but it's reached a point when it says "no more!" So thought I'd build mom a little larger custom-made tea box that would match the decor in her kitchen and would also be something from my heart. And kudos for my slow work, but got it done in time for Valentine's Day. Perfect!

Materials used were basically Baltic birch plywood cut on my scroll saw (since I don't have a table saw) and wood glue. I kind of made my pattern as I went. And when I was gluing the front pieces on, covered the bas-relief pieces with paper so I wouldn't get glue on them while doing paste-up, and yet, when I took off the papers, well, there were glue stains all over them. Ah well. Chalk it up to a learning experience. This was the first box I ever made so am still pretty happy with it, and mom was ecstatic! We especially love the woodsie shapes used to make flower petals on the top. Transforms a plain box into a box with a simple but free-out-in-nature flair.

At least a third larger than her previous plastic tea box (which BTW was so crammed that that was probably why the lid broke and then kept breaking after repairs. 


the lid accented with woodsie shapes 
Mom is in love with her new "fancy" and certainly one-of-a-kind tea box!

Sunday, January 31, 2016

More Baltic Plywood Horses

My mom and I had so much fun making Baltic plywood horses last winter that I thought we'd do it again. This round I fenangled to get 31 horses and all their parts out of a smallish piece of plywood, and this year, instead of carefully sanding the pieces by hand, I whipped out the deck sander and buzzed all the little pieces with that. Only if some tiny corners needed smoothing did I do a bit of hand-sanding. What a time-saver!

Also this year mom and I splurged a bit and got 25+ four-ounce bottles of water color paints in a wild range of color. So with all our fancy colors, we sure had fun decorating our latest horse herd. For last year's herd, check out Baltic Plywood Horses of 2015.

For a couple of days, our kitchen table was buried in fun stuff!
While some horse parts were drying, was busy painting on another horse. Four horses in progress in this picture.
These were our most creative (and unusual) horses this year.
Mom gave her retired friends all a belated Christmas present ... and wow were they pleased
for something "fun" to add to their Christmas trees for next year.

Sure is fun painting them (and a lot of work) but really have no use for them now, so have asked my brother to give them away at a children's hospital around Christmas. I can't imagine a better place to send them off to!

Tuesday, March 10, 2015

Baltic Plywood Horses

Browsing the web I stumbled across a pattern for making cardboard horses. Ann Wood, the craftsy designer, drew up three patterns (about 6-inch sized horses) and made a stampede of 100 cardboard horses. Her horses have been widely posted on the web and so creative that I took a closer look at her website. Very creative and suitable for almost all ages! But it kind of amazed me that so much effort would be put into cardboard horses rather than more enduring wooden horses ... that's a lot of work for just a cardboard frame, so I thought I would make some wooden ones.

Baltic pine plywood is the way to go. It cuts easily, shapes easily, doesn't break down like other plywood that has poor wood-fill composition, and it also takes paint well. I bought a 4'x2' sheet and proceeded to trace out the horses via carbon paper. OK, that took a looooong time. Actually I'm glad I didn't count the hours that went into making these, but once I got started, I wanted to do quality work so paid a little more attention to detail than if I were making something out of cardboard.


Tools needed:
  • carbon paper
  • needle-nose pliers
  • buttons -- four for each horse
  • twisty-ties (free from the produce section at the store)
  • water colors
  • paint brushes
  • markers (optional)
  • paper cups and paper towels
  • Baltic pine plywood
  • sandpaper
  • drill
  • scroll-saw
  • optional: lace, yarn, ribbon, etc for manes and tails (hot-glue gun)
Here is the step-by-step process:
  • traced out the three different patterns of horses (carbon paper)
  • with a scroll-saw cut the horses out piece by little piece (I didn't follow the tracings because I wanted personality and not clone horses; that made the cutting a lot faster and involved a little creativity)
  • sanded each little piece by hand
  • drilled holes for fastening on the legs
  • painted the pieces with water colors (touch up with markers)
  • fastened the pieces together with wire (twisty-ties from the store -- free), buttons and a needle-nose pliers


Now what to do with them? I made 39 horses out of the 4'x2' sheet of Baltic pine plywood. I've given a few away but the rest, not sure. My younger bro piped up that they would make a really cool Christmas tree, and I think he's right, so the horses are packed away for Christmas.  Think I might get some more Baltic pine plywood and make a lot of white stars to balance out the color on the tree.

And now for niece (10) and nephew's (6 1/2) contribution. They had so much fun creating their horses. Now they're requesting snowflakes and stars. Hmm, we'll see.